Understanding the RadSystems Studio 9 Interface – A Complete Walkthrough
If you're venturing into the world of low-code development, RadSystems Studio is a tool you’ll definitely want to explore. But like any powerful platform, it’s important to first understand the UI to unlock its full potential. In this article, we’ll walk you through the RadSystems Studio UI.
RadSystems Studio is a powerful low-code and no-code development environment that enables users to build full-featured web applications directly from their databases. It supports popular technologies like PHP Laravel, Python, Node.js, and .NET, and it’s designed to drastically reduce development time without sacrificing flexibility. With built-in tools for authentication, roles, APIs, visual design, and rapid publishing, RadSystems bridges the gap between non-developers who want to create apps and seasoned developers who want to accelerate delivery.
But like any powerful platform, it’s important to first understand the user interface to unlock its full potential. In this article, we’ll walk you through the RadSystems Studio UI, explain what each part does, and help you get comfortable with the environment so you can focus on what really matters—building great apps.
Starting with RadSystems Studio: Creating or Opening a Project
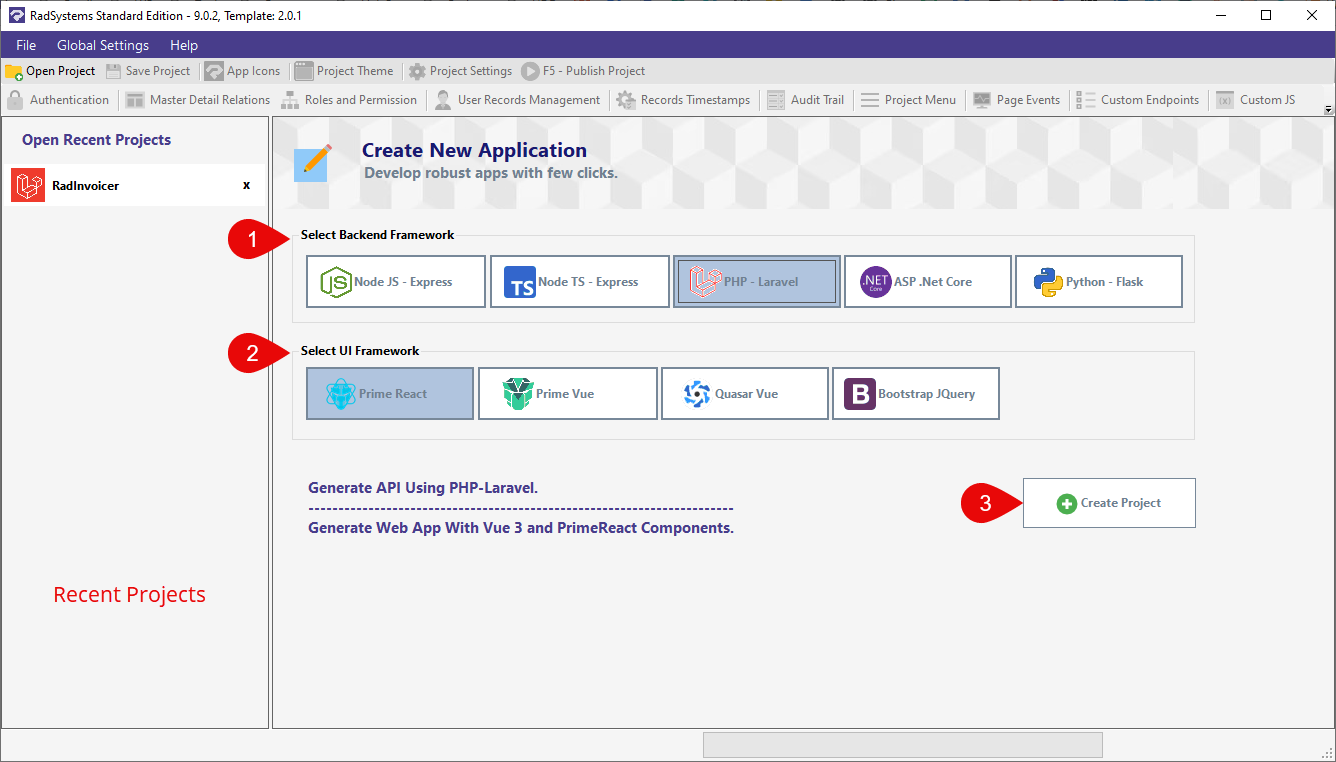
When you launch RadSystems Studio, the first screen you’ll see is the project selection and creation interface. It’s designed to get you started quickly, whether you’re resuming an existing project or creating a brand new application from scratch.
On the left, under Open Recent Projects, you’ll find a list of your previously worked-on projects. Just click the project name to open it instantly. Alternatively, use the Open Project button from the top menu if you want to browse and load a project saved elsewhere on your system.
If you’re starting fresh, the process is equally straightforward. First, select a backend framework. RadSystems supports a wide range including Node.js (Express), Node TypeScript, PHP Laravel, ASP.NET Core, and Python Flask. Once you've chosen your backend, move to the second step—select your UI framework. You can pick from modern and powerful options like PrimeReact, PrimeVue, Quasar Vue, or Bootstrap jQuery.
After making your selections, click on the Create Project button.
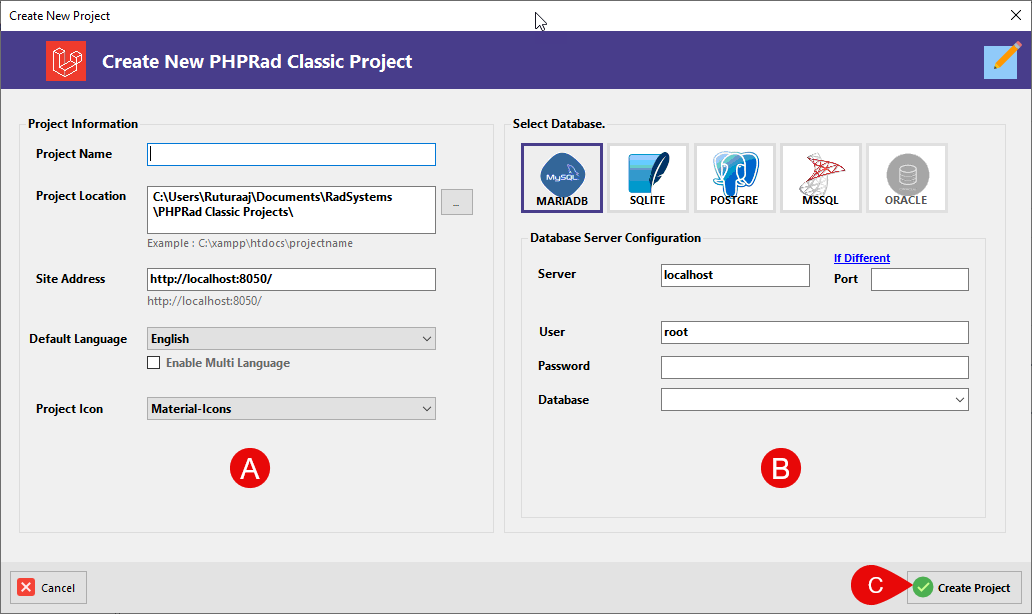
This will bring up a new window where you'll be asked to enter your project name, choose a folder location to save it, and pick an icon set that will be used across your app’s interface.
Next, you'll define your database source. Select the type of database you want to work with, whether it's MySQL, PostgreSQL, MS SQL, or others. Enter the necessary connection credentials, and hit the Create Project button again. RadSystems will now automatically read your database schema and populate all your tables and views into the application’s work area. This sets the foundation for you to build, design, and customize full-featured applications without writing complex code.
This simple yet powerful process is part of what makes RadSystems Studio such a compelling tool for developers and business users alike.
Now, let's dive deeper into the basics of RadSystems Studio UI.
1. The Menu Bar
At the very top of the screen, you’ll find the Menu Bar. It contains essential menus for managing your project and getting help when you need it.
- File
This menu includes:- Save As – Save your current project with a new name or location.
- Close Project – Exit the current project without closing the software.
- Exit Application – Closes RadSystems Studio entirely.
- Global Settings
This option lets you configure application-wide settings that impact all generated apps—like global UI themes, session handling, default behavior, and more. - Help
Here, you can find:- About – Displays version and license information.
- Support – A quick link to RadSystems support channels.
- Facebook, YouTube, Twitter – Easy access to their social communities and learning content.
2. The Primary Button Bar
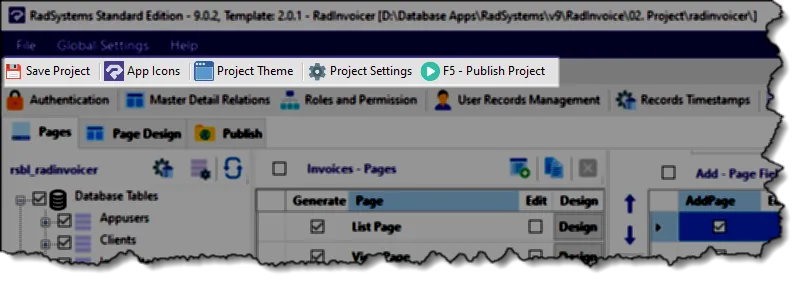
Just below the menu bar is a compact row of buttons for primary actions:
- Save Project – Saves all your changes across the project.
- App Icons – Allows you to set favicon and App Logo used in your generated app.
- Project Theme – Lets you choose and customize your application's overall look and feel, including color schemes and layout presets.
- Project Settings – This is where you define project-wide configurations such as language, date format, currency, or layout type.
- F5 - Publish Project – Generates your application files and launches it in your browser, depending on your settings.
3. The Functionality Button Bar
This row is where things start to get powerful. These buttons give you access to most of RadSystems Studio’s built-in logic and customization features.
- Authentication
Here, you can set up a complete authentication system. It includes user registration, login, password reset, and even two-factor authentication. You can also generate a ready-made login page and configure which pages require authentication. - Master Detail Relations
This is used to link parent and child tables. For example, linking anInvoicestable with anInvoiceItemstable so the child records can be embedded and managed within the parent form. - Roles and Permission
Manage access control by creating different roles like Admin, Manager, or User, and specify what each role can see or do. You can restrict entire pages or specific actions like Add, Edit, or Delete. - User Records Management
Automatically assign records to the currently logged-in user and filter data so users can only see their own records. Perfect for multi-tenant applications or apps where users manage their own content. - Records Timestamps
Enable automatic tracking of who created or updated each record, along with the corresponding timestamps. This works without any manual coding and integrates well with CRUD operations. - Audit Trail
Adds advanced logging to track changes made to records. You’ll know what was changed, when it happened, and which user performed the action—ideal for compliance or debugging. - Project Menu
Customize the navigation menu structure of your application. You can add icons, group items under headings, and add new custom menu items, too. - Page Events
Attach custom logic to CRUD operations. For example, you can run server-side code before inserting data, after updating a record, or after deleting one. - Custom Endpoints
Create your own REST API endpoints with custom logic and structure. This is extremely useful for integrating with third-party services or exposing custom APIs for your frontend apps.
4. The Work Area Tabs
The central part of the screen is the Work Area, and it’s divided into three main tabs: Pages, Page Design, and Publish.
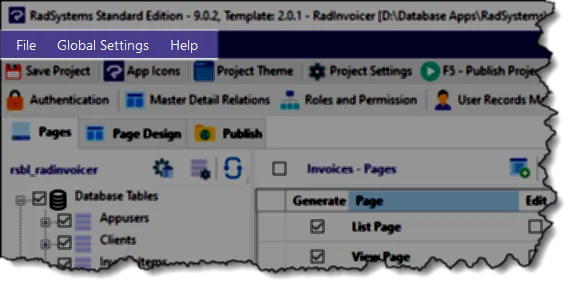
Pages Tab
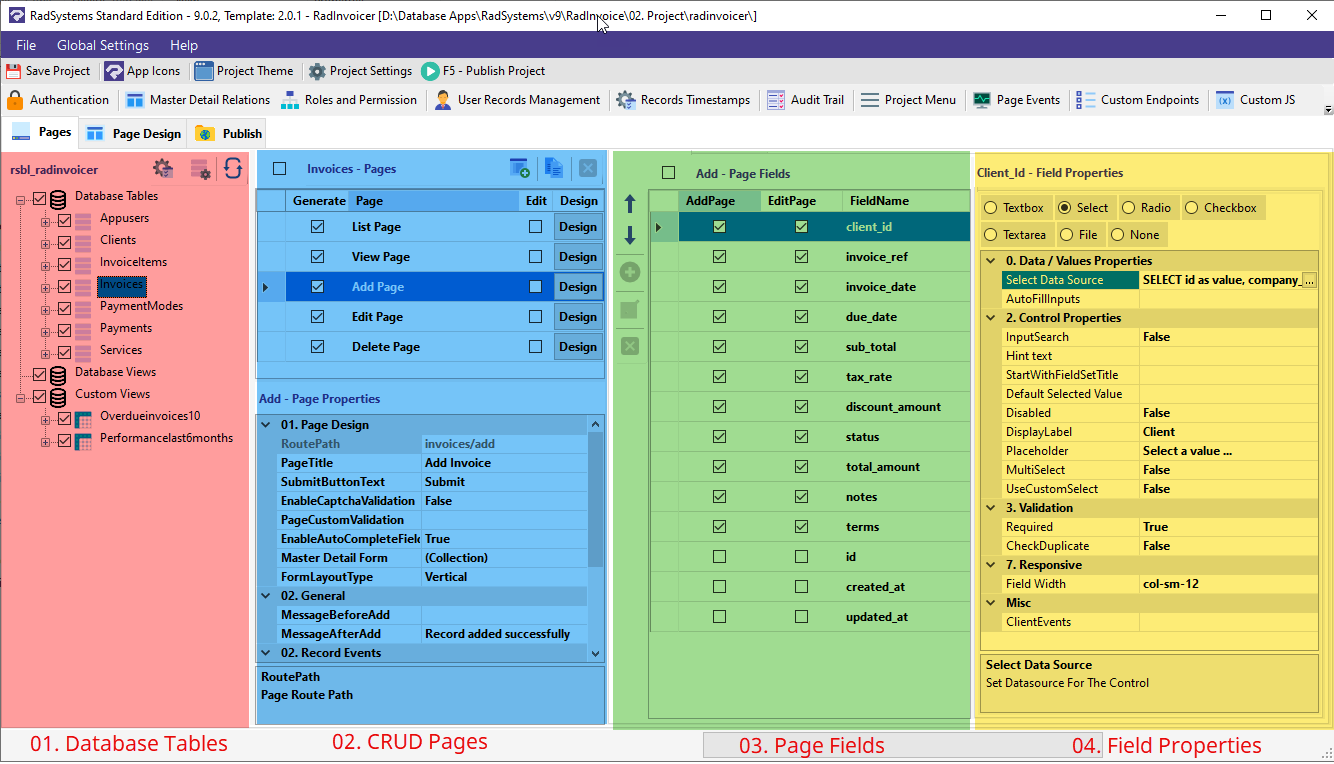
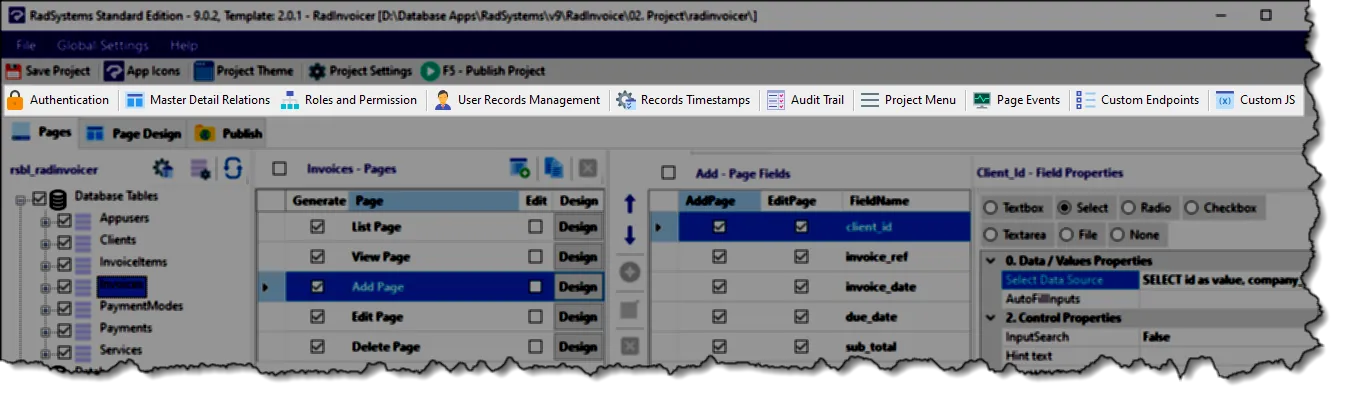
This is where most of your database-driven logic lives. The interface is split into four columns, each offering increasing levels of detail:
- First Column – Database Tables and Views
This column displays a tree structure of all your tables and database views. You can quickly navigate and manage CRUD operations for any table here. - Second Column – CRUD Pages
For every selected table, RadSystems generates pages such as List, View, Add, Edit, and Delete. You can enable or disable any of these and even design each one separately. - Third Column – Page Fields
Once you select a specific page (like Add or Edit), you’ll see all the fields available for that page. You can include or exclude fields and control how they behave during data entry or display. - Fourth Column – Field Properties
When you select a field, this panel shows its detailed properties. For List or View pages, this includes display settings. For Add/Edit pages, you can configure how the field looks (textbox, select, checkbox, etc.), set data sources, placeholders, validation rules, and even add client-side events.
Page Design Tab
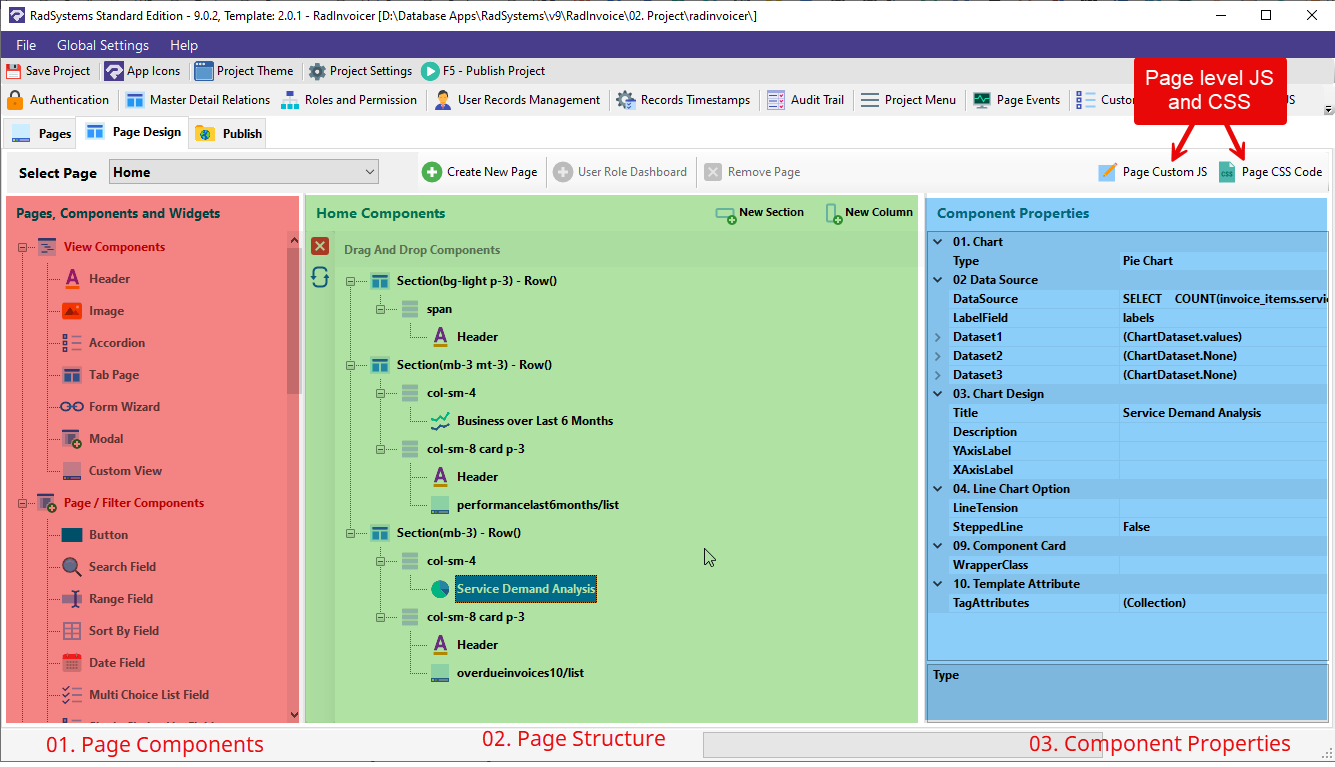
One of the most powerful features of RadSystems Studio is its visual drag-and-drop page builder, which allows you to build rich user interfaces without writing code manually. When you switch to the Page Design tab, you’re presented with a clean and structured workspace divided into three main columns:
1. Page Components
- Located on the left, this panel contains all the UI components and widgets you can use in your page layout.
- These include headers, text blocks, charts, filters, accordions, tabbed pages, form wizards, buttons, modal windows, date and range pickers, and many more.
- There are also page/filter components and multi-choice lists that allow for advanced interactions.
- If you're building a data-driven app, you’ll appreciate the ability to use subpage components to nest one CRUD interface inside another—great for dashboards and relational interfaces.
2. Page Design Structure
- This is your central canvas where you actually build the page. You start by creating sections, then add columns within those sections, and finally drop components into those columns.
- This nested structure gives you full control over your layout, spacing, and responsiveness.
- Each element is clearly labeled, and you can drag-and-drop to reorder, duplicate, or delete components with ease.
3. Component Properties
- After placing a component in your layout, the right-hand panel updates to show all available configuration options for the selected component.
- Whether you’re working with a chart, a form field, or a custom text block, you can customize labels, assign data sources, bind to specific fields, define style classes, and apply conditional visibility rules. For charts, you can set data fields, axis labels, chart types (like bar, line, pie), and more.
Custom JS and Custom CSS Buttons
Just above the properties panel, you’ll find two incredibly useful options—Page Custom JS and Page CSS Code. These buttons allow you to inject JavaScript and CSS code specific to the page you are working on. This is not application-wide—your scripts and styles will apply only to the current page. It’s perfect for fine-tuning UI behavior, adding interactions, or overriding default styles without affecting the rest of the app.
With this intuitive design environment, RadSystems empowers users of all skill levels to create sophisticated, responsive, and data-rich user interfaces—visually and efficiently.
Publish Tab
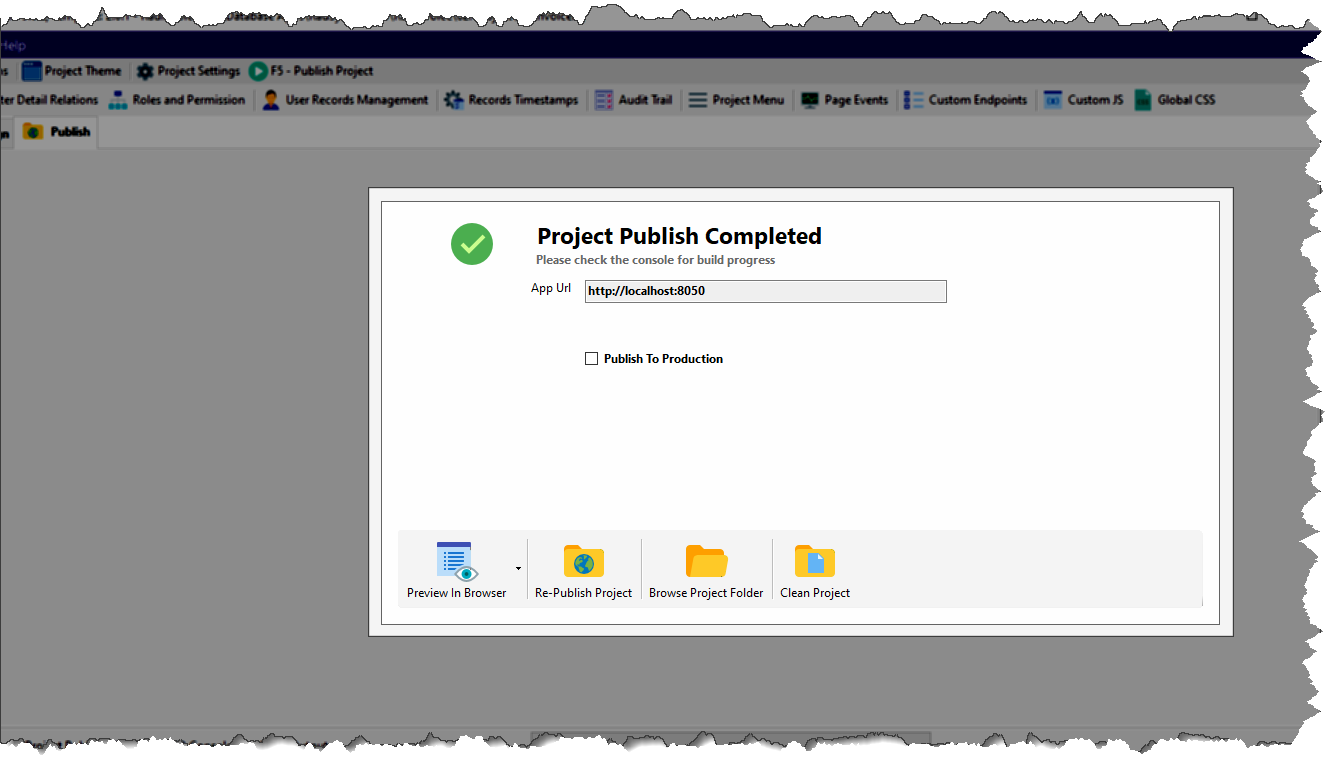
Once your application is ready and your data connections are set, it's time to bring your application to life. That’s where the Publish tab comes in. It allows you to compile, test, and even clean your project for a smooth deployment. After hitting the publish button, you’ll see a confirmation screen with a success message and a local URL where your app can be previewed.
Here’s what you can do from the publish screen:
Preview in Browser
Launches your generated application in the default or selected browser so you can start testing immediately. It’s a fast way to validate changes and ensure everything looks and works as expected. Make sure your chosen browser is installed and available on your system.
Re-Publish Project
Sometimes, after major updates or unexpected glitches, you may need to regenerate your app from scratch. This button clears any intermediate build issues and republishes your project entirely, ensuring a fresh and clean output.
Browse Project Folder
Need direct access to your codebase, assets, or configuration files? This button opens the project folder where you can inspect or manually tweak files as needed—ideal for advanced users or those integrating custom logic.
Clean Project
Over time, unused files or redundant build artifacts may accumulate. The Clean Project option scans and detects these leftovers, giving you the option to remove them and keep your project streamlined. It’s a smart way to maintain performance and avoid clutter.
Get Started - Today!
RadSystems Studio offers a lot of power through a highly visual and structured interface. Once you’re familiar with the layout and what each section does, you’ll find that building a full-featured web app is faster and easier than ever.
From database to deploy, everything is streamlined—and with just a few clicks, you can implement complex features like authentication, role-based access, dynamic dashboards, and even custom APIs.
Whether you're a solo developer, a freelancer, or working with a team, mastering the RadSystems interface is your first step toward building production-ready apps faster.
Happy building!