Master-Detail Management in RadSystems Studio
When building data-driven applications, one of the most common challenges developers face is managing complex relationships between records. That’s exactly what RadSystems Studio offers with its Master-Detail relationship management features.
When building data-driven applications, one of the most common challenges developers face is managing complex relationships between records. Think of scenarios like an order and its items, a customer and their transactions, or an invoice and its line entries. Handling these relationships manually takes time, requires a good amount of code, and is prone to inconsistencies if not managed well. But what if all of this could be handled with zero code—just clicks, configurations, and clean UI? That’s exactly what RadSystems Studio offers with its Master-Detail relationship management features.
Example Scenario: Invoice and Invoice Details
To make this clearer, let’s take the classic example of an Invoice system.
Here’s how it works:
- The Invoice table contains high-level information like customer name, invoice date, total amount, and status.
- The Invoice Details table stores individual line items—product name, quantity, unit price, subtotal—each tied to a specific invoice via a foreign key.
This model is simple yet powerful. It reflects real-world business workflows and allows for granular data management—exactly what modern applications need.
RadSystems Studio: Master-Detail Relationship, Simplified
RadSystems Studio takes the Master-Detail concept and integrates it deeply into its low-code platform. Whether you're generating a CRUD module or building a full-featured admin panel, setting up a Master-Detail relationship is not only possible—it’s intuitive and fast.
Here’s a quick overview of what’s possible:
- Interactive AJAX Popups: Click on an item in the list, and watch a sleek AJAX-powered detail panel slide in from the right or below. It dynamically loads associated records without reloading the page, offering a smooth and modern user experience.
- Detail Display on View Pages: When viewing a record from the Master table, associated Detail records are automatically displayed below or beside the main content. This creates a seamless narrative of related data, ideal for applications like billing systems, project tracking, and more.
- Professional UI: The interfaces generated by RadSystems Studio look clean and production-ready out of the box. You get the layout, design, and interactions that you'd typically expect from custom-built enterprise apps.
- Best-in-Class User Experience: Thanks to AJAX-based interactions and responsive components, users never face jarring page reloads. Everything feels fast, native, and intuitive.
Whether you're building an internal tool or a commercial product, RadSystems’ Master-Detail features let you deliver polished results quickly—with no compromise on user experience or data structure integrity.
Configuring Master-Detail Relationships in RadSystems Studio
The next step is to implement Master Detail Relationship in your application. RadSystems Studio makes this incredibly simple through its visual, no-code interface.
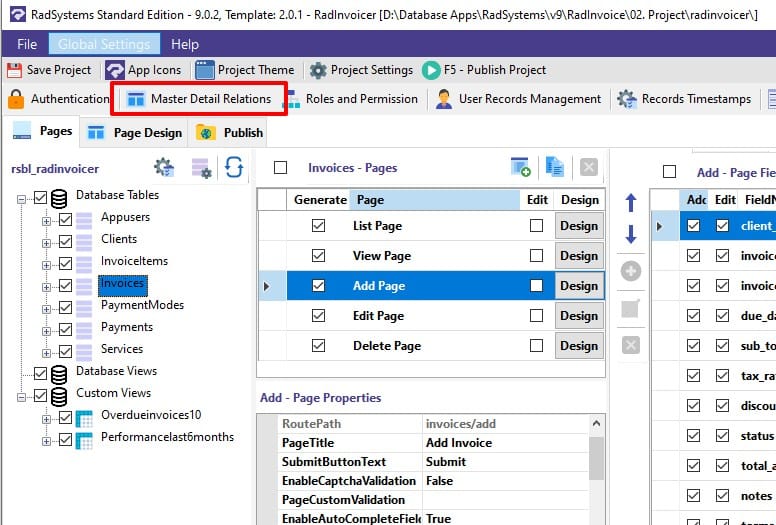
To begin, open your project in RadSystems Studio. You’ll notice two rows of buttons along the top of the main interface. Look for the “Master Detail Relations” button—it’s your gateway to setting up and customizing the relationship between master and detail tables.
Clicking this button brings up a dedicated screen where all Master-Detail configuration happens.
Step-by-Step: Setting Up a Master-Detail Relationship
- Select Your Master TableFrom the list of existing tables on the left, click on the table that will serve as the Master in your relationship—say,
Invoices. This is the parent table whose records will each have associated details. - Add a Detail PageWith the Master table selected, click the “Add Detail Page” button. This will add a child node beneath your selected table, representing the new Detail relationship (for example,
InvoiceItems).
Detail Pages Configuration for Master Table: Invoices
Two detail pages are defined here: Invoiceitems/List and Payments/List specific to the sample Invoice application. The following focuses on the Invoiceitems/List configuration as seen in the selected setup.
01. Master Detail Relation
- RelationType:
OneToMany
Defines a one-to-many relationship between the master table (Invoices) and the detail table (InvoiceItems). One invoice can have multiple items. - Master Table:
Invoices
Specifies the parent table in this relationship. - Master Table Field:
id
Refers to the primary key field in the master table used for linking. - Detail Table:
InvoiceItems
This is the child table containing related data records. - Detail Foreign Field:
invoice_id
The foreign key in theInvoiceItemstable that links back to theInvoicestable. - Relation:
Invoices.id = Invoiceitems.invoice_id
This is the actual SQL-style mapping condition between the two tables.
02. Detail Page
- Detail Page:
List
The layout type used to present the relatedInvoiceItemson the page. - Page Title:
Invoice Items
This title will appear above the detail list tab. - Page Icon:
<i class="fa fa-list-ul "></i>
A Font Awesome icon string. Though icons may render visually, this setting accepts HTML-compatible icon classes. - Show Page Header:
False
Disables the display of the header section on the detail page, offering a cleaner interface. - Show Page Footer:
True
Enables the footer section, often used for aggregation functions such as SUM, COUNT, MIN, MAX etc.
Master Page Settings for Invoices
These properties define how the detail pages behave and display on the main page for the Invoices table.
01. Detail Page Display
- Detail Page Header Title:
Invoices Records
The main heading displayed above the grouped detail tabs. - Group Pages By Tab:
TabControl/Accordion/None
Multiple detail pages will be organized and displayed using tabbed navigation.
02. Master Detail Pages
- ListPage:
True
The list view of the master records (Invoices) is enabled. - ViewPage:
True
Viewing of individual invoice records is enabled. - EditPage:
True
Editing functionality for master records is enable
Every section, every dropdown, every checkbox is placed with purpose, making it easy for even non-developers to implement enterprise-grade functionality.
Creating Seamless Data Entry with the Master-Detail Add Form
In many real-world applications, a master-detail relationship isn’t just about viewing related records—it’s about creating them together. Think of adding an invoice and its items in one go. RadSystems handles this elegantly with its Master-Detail Add Form feature.
This is where the Add form for a master table can also collect detail records during the same operation. For instance, when adding a new invoice, you can also enter its line items—without switching pages.
Setting It Up: From Master to Detail in One Go
Let’s walk through the steps using an example where you want to add InvoiceItems while creating a new Invoice.
- Start with the Add Page for the Master TableNavigate to the
Invoicestable and select its Add page. This is the form where new invoices are entered. - Access the Master Detail Form ConfigurationIn the Add page’s properties, look for the “Master Detail Form” property. Click the
...button beside it. This brings up the Page Master Detail Form window—as shown in the attached screenshot. - Configure the Master-Detail Add FormThe interface is divided into two parts: the list of detail forms on the left, and the configuration panel on the right.Here’s how to set it up:
- Step 1: Click "Add Detail Form"
Press the green ➕ Add Detail Form button. This adds a new detail entry on the left (e.g.,invoiceitems/add). - Step 2: Set the Master-Detail Relationship
On the right-hand side, configure the relation:You’ll notice the relation is automatically shown at the bottom, confirming something like:
Relation: Invoices.id = invoiceitems.invoice_id- Relation Type: Usually
OneToMany(like one invoice having many items). - Detail Page: Select the Add page for the related detail table (e.g.,
invoiceitems/add). - Referenced Field: Choose the foreign key in the detail table that links back to the master (e.g.,
invoice_id).
- Relation Type: Usually
- Step 3: Click “Okay”
That’s it. Just hit the Okay button to save the configuration.
- Step 1: Click "Add Detail Form"
Now, when users open the Add Invoice form, they’ll also see an embedded section to input multiple InvoiceItems. This creates a clean, unified experience for entering master and detail records together.
This powerful yet simple setup means you can handle multi-level data entry in a professional way—with no coding, just configuration. RadSystems turns complex relational workflows into visual simplicity.
Build Powerful Applications—No Code, No Limits
RadSystems Studio showcases the true potential of modern no-code development—empowering developers, startups, and businesses to build powerful, data-driven applications with minimal effort and maximum efficiency. Features like the Master-Detail Add Form demonstrate how complex relational logic can be handled visually, saving countless hours of coding while still delivering professional-grade results. Whether you're building admin panels, business tools, or full-scale CRUD applications, RadSystems gives you the control, speed, and flexibility you need—all without writing a single line of backend code.