Extending Application Logic with Page Events in RadSystems
RadSystems Studio is more than just a no-code development platform. Whether you are building a simple data-entry app or a complex business workflow, RadSystems gives you the flexibility to fine-tune how your application behaves.
RadSystems Studio is more than just a no-code development platform. While it empowers users to rapidly build applications using visual tools and drag-and-drop components, it also offers powerful low-code features that take development beyond point-and-click. These low-code capabilities allow developers to inject custom logic where needed—enabling more refined, functional, and business-specific applications. Whether you are building a simple data-entry app or a complex business workflow, RadSystems gives you the flexibility to fine-tune how your application behaves.
The Role of Entry Points in Data Flow
When building data-driven applications, there are often scenarios where developers need to perform specific actions before data is saved to the database, or take follow-up steps after the data is successfully stored. For example, you might want to validate inputs against a custom rule, log activities, send notifications, or update other related tables. These needs require controlled entry points in the application’s data flow—specific moments where your custom logic can run. This is precisely where Page Events come into play.
What Are Page Events?
Page Events in RadSystems are entry points in the backend data flow of the generated application. They allow you to hook into different stages of the page’s lifecycle—before and after key operations like adding, editing, deleting, listing, or viewing data. Technically, these events are server-side functions triggered during the execution of the core CRUD operations. They offer a structured and safe place to add your custom logic without interfering with the main application flow.
Server-Side Nature of Page Events
Since Page Events are part of the backend framework, any code written within them is executed on the server side. The language you use to write Page Event logic depends on the backend framework you selected while creating your project. If your backend is based on PHP (Laravel), Python (Flask), Node.js (Express), or any other supported environment, your Page Event code must conform to that language.
This ensures that the custom logic integrates seamlessly into the backend pipeline, allowing for things like custom validation, data transformation, logging, and even conditional redirects.
How Page Events Work Internally
Under the hood, Page Events are just functions added to the Controller of the selected table. These functions are automatically invoked by RadSystems during specific stages of the data transaction. For example, before saving a record, the application will check whether a beforeAdd event function exists. If it does, it will execute that function first. The same applies to actions after data is stored (afterAdd), before deletion (beforeDelete), and so on.
This method ensures that your custom logic is encapsulated in well-defined functions, preserving the maintainability and modularity of your code. It also allows your logic to be upgraded or debugged independently from the core logic of the application.
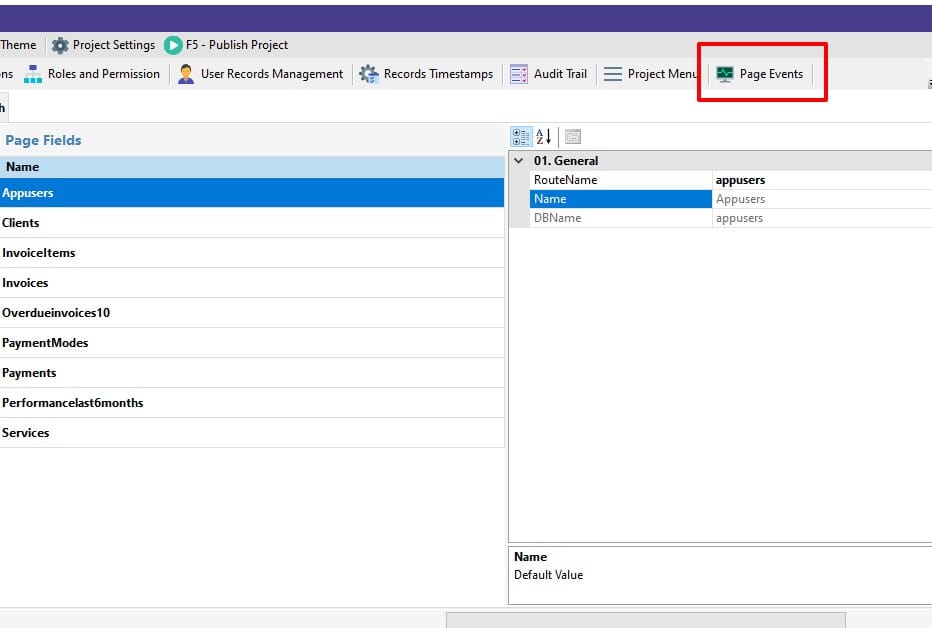
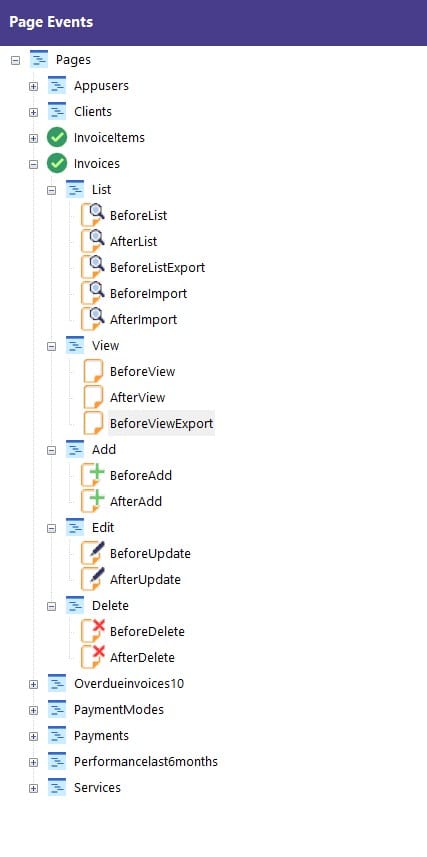
Page Events Supported Across All Pages
RadSystems provides a consistent and comprehensive set of Page Events for all standard page types:
- Add Page Events:
beforeAdd,afterAdd - Edit Page Events:
beforeUpdate,afterUpdate - Delete Page Events:
beforeDelete,afterDelete - List Page Events:
beforeList,afterList,beforeListExport - Import Events:
beforeImport,afterImport - View Page Events:
beforeView,afterView,beforeViewExport
Each of these event functions offers access to relevant data and context, such as form inputs, current records, user session, and request information—allowing you to build rich backend logic with minimal effort.
Exploring Page Event Functions in Practice
Now that we understand what Page Events are and how they fit into the architecture of a RadSystems-generated application, it’s time to take a closer look at how they are implemented. RadSystems offers a clean, organized way to inject custom logic through well-defined functions—each tied to a specific event in the page lifecycle.
These functions reside within the Controller of the respective table and follow a standard structure, making them easy to locate, edit, and maintain. Each function typically receives specific arguments that give access to data or context needed to execute meaningful business logic.
Page Events for List Page
beforeList
This function is called before the records are fetched from the database and shown on the List page. It allows you to filter, manipulate, or log the request before any data retrieval occurs.
/**
* Before page list record
* @param string $fieldname //filter records by table field
* @param string $fieldvalue //filter value
*/
private function beforeList($fieldname = null, $fieldvalue = null){
//enter statement here
}
Use this event to apply custom filters based on user roles, conditions, or external inputs.
afterList
This function is executed after the records are fetched but before they are sent to the frontend. It gives you the opportunity to transform or enrich the records.
/**
* After page list record
* @param array $records //array of selected records
*/
private function afterList($records, $fieldname = null, $fieldvalue = null){
//enter statement here
}
This is ideal for adding computed fields, masking sensitive data, or reformatting content before it's rendered on the page.
beforeListExport, beforeImport, afterImport
These are not full-fledged functions like the others but rather embedded code entry points. The code written under these event names is directly merged into the respective sections of the main functionality methods in the Controller. Here's what that means:
beforeListExport: Code written here executes right before a list is exported to Excel, PDF, or CSV. Useful for cleaning or formatting data before export.beforeImport: Executes before import begins, allowing you to validate the structure or content of incoming data.afterImport: Triggers after import completes. You can use it to update related tables, log the import activity, or send alerts.
These inline hooks are strategically placed to allow maximum control over extended functionalities while keeping the core logic modular.
Page Events for View Page
Similar to the List page, the View page also supports key event hooks that allow you to interact with the data before and after it's fetched from the database. This is especially useful when you want to perform additional lookups, compute totals, or prepare data before rendering it on the view template.
beforeView
This function runs before the actual record is fetched from the database. It provides an opportunity to validate the request or pre-fetch related data that might be used in the view.
/**
* Before view page record
* @param string $rec_id // record id to be selected
*/
private function beforeView($rec_id){
//enter statement here
//get total payments and pass it to view blade.
}
You might use this to calculate totals from a related table or check access permissions before continuing.
afterView
This event is triggered after the record has been retrieved but before it’s rendered. You can manipulate the $record object here to modify field values, format data, or include additional fields.
/**
* After view page record
* @param string $rec_id // record id to be selected
* @param object $record // selected page record
*/
private function afterView($rec_id, &$record) {
// enter statements here.
}
This is the ideal place to enrich the record with extra details fetched from other tables or perform logic that depends on the final fetched result.
beforeViewExport
Like beforeListExport, this is not a separate function but an inline entry point in the controller’s export routine for the View page. Any code written here executes right before the record is exported to PDF, Excel, or another format.
Use this entry point to fine-tune formatting, prepare computed values, or clean up the data before the export occurs.
Page Events for Add Page
When a new record is being added to the database, RadSystems provides two entry points—one before and one after the insertion process. These allow you to validate the incoming data or trigger subsequent actions after the record has been created.
beforeAdd
This function runs just before a new record is inserted into the database. It is often used to apply custom validations or enforce rules. If it returns true, the process continues. If it returns a string, the process is halted and the string is shown as an error message to the user.
/**
* Before create new record.
* Return true to continue, or return the error message to show and cancel Add.
* @param array $modeldata // validated form data used to create new record
*/
private function beforeAdd($modeldata){
//enter statement here
return true;
}
This is especially useful for cases like checking for duplicate values or validating complex conditional logic before data insertion.
afterAdd
Once a new record has been successfully added, this function is triggered. It provides the newly created record for any post-processing such as logging, sending notifications, or inserting data into related tables.
/**
* After new record created
* @param array $record // newly created record
*/
private function afterAdd($record){
//enter statement here
}
Page Events for Edit Page
Editing a record also supports a pair of page events. These can be used to intercept the process before or after a record is modified.
beforeEdit
This function is called before an existing record is updated. Just like beforeAdd, it must return true to allow the update or return a string to stop the process with a message.
/**
* Before update page record
* Return true to continue, or return the error message to show and cancel Update.
* @param string $rec_id // record id to be updated
* @param array $modeldata // validated form data used to update record
*/
private function beforeEdit($rec_id, $modeldata){
//enter statement here
return true;
}
This can help validate whether a record is allowed to be edited or enforce update conditions based on user roles or record state.
afterEdit
After the update has been applied, this function executes. It gives you access to the updated record and can be used to log changes, update related data, or send alerts.
/**
* After page record updated
* @param string $rec_id // updated record id
* @param array $record // updated page record
*/
private function afterEdit($rec_id, $record){
//enter statement here
}
Page Events for Delete Page
RadSystems provides hooks to control what happens before and after a record is deleted. These allow you to prevent deletion under specific conditions or perform clean-up actions after the record is removed.
beforeDelete
This function executes before a delete operation begins. If it returns true, deletion proceeds. If it returns a string, the process stops and the message is displayed to the user.
/**
* Before deleted record
* Return true to continue, or return the error message to show and cancel Delete.
* @param string $rec_id // record id to be updated
*/
private function beforeDelete($rec_id){
//enter statement here
return true;
}
Use this to prevent deletion of critical records or ensure that no dependent records are left orphaned.
afterDelete
Once a record is deleted, this function is triggered. You can use it to clean up related records, update counters, or log the action.
/**
* After record deleted
* @param string $rec_id // deleted record id
*/
private function afterDelete($rec_id){
//enter statement here
Each of these hooks provides a precise opportunity to tailor the behavior of your RadSystems application. Whether you're performing data validation, enforcing business rules, or managing dependencies, page events offer the flexibility to do so in an organized and scalable way.
Real-Life Use Case: Exporting Invoice with Invoice Items for Print
Let’s now move from theory to practice and explore how page events can help implement real business logic. One commonly needed functionality in many applications is printing an invoice along with its line items. This is a perfect example to demonstrate the power of page events in RadSystems.
If you are using another backend like Node.js, Python, or ASP.NET, the implementation will differ—but the overall flow and logic remain the same.
The Scenario
We want to export a single invoice for printing, including all its invoice items (services/products). Since the View Page of the Invoices table is where we access a single record, this is where we should hook into the export process.
Step 1: Enable Export on the View Page
Before you can implement the logic, go to the Invoices table, then open the View Page settings, and enable the export feature. This ensures that the page supports export functionality.
Step 2: Open the Page Event
Navigate to:
Page Events → Invoices Table → View Page → beforeViewExport
Click the "Edit Page Event" button to open the code editor for this specific event.
Step 3: Write the Export Logic
By default, the view page already sends the invoice data to the report template. However, it does not include the invoice items. To include them, we’ll write custom code inside the beforeViewExport page event.
Here’s the code snippet:
// statements before export start
$invoice = $query->findOrFail($rec_id, Invoices::exportViewFields());

// Fetch items with service details using Eloquent
$items = \App\Models\InvoiceItems::select([
    'invoice_items.id as item_id',
    'invoice_items.invoice_id as invoice_id',
    'services.name as service_name',
    'invoice_items.description as service_desc',
    'invoice_items.unit_cost as service_unitcost',
    'invoice_items.quantity as service_qty',
    'invoice_items.line_total as line_total'
])
->join('services', 'invoice_items.service_id', '=', 'services.id')
->where('invoice_items.invoice_id', $rec_id)
->get();

// Attach to request
$request->attributes->add(['export_items' => $items]);
// statements before export end
- Retrieves the invoice record using the given
$rec_id. - Fetches related invoice items from the
invoice_itemstable, joined with theservicestable for service details. Here, I have used Laravel Eloquent Query model. - Attaches the result to the Laravel
$requestobject using$request->attributes->add(). This makes the items available in the report blade template.
Where to Display the Data
This blog post focuses only on page events, but to use the data inside the actual export file, open the corresponding Blade template inside:
resources\views\reports
Locate the relevant file (usually named something like invoice-view-export.blade.php) and use the $record variable for the invoice data, and request()->attributes->get('export_items') to loop through the invoice items.
You can customize the design of the exported invoice template using HTML and CSS to suit your print layout needs. Please refer to "invoices-view.blade.php" file from the sample project's generated application for details.
Wrapping Up
This example shows how RadSystems' page events can help you inject business logic precisely where needed. Whether you're fetching related data, enforcing access rules, or preparing a custom export—page events provide a clean, maintainable, and scalable way to extend your application’s capabilities.
Power Up Your Logic with Page Events
RadSystems' page events give you the power to inject logic exactly where it matters, making your applications smarter, more dynamic, and tailored to real business needs without cluttering your codebase.