Unlocking the Power of Custom Endpoints in RadSystems Studio
What if you need a specific action that doesn't fit neatly into an "edit" or "update" form? This is where you unlock the next level of RadSystems' power with Custom Endpoints.
In the rapidly evolving world of software development, speed, flexibility, and scalability are not optional—they're essential. That’s where RadSystems Studio truly shines. As a powerful low-code development platform, RadSystems enables you to build modern web, desktop, and mobile applications at lightning speed—without compromising on control or customization.
RadSystems Studio has carved a niche for itself as a versatile and powerful low-code application builder. It's renowned for its ability to generate fully-featured web and mobile applications from your database in minutes. By handling the repetitive, boilerplate code for Create, Read, Update, and Delete (CRUD) operations, it frees up developers to focus on what truly matters: building the custom features that deliver real value to users.
But what happens when you need to go beyond the standard CRUD? What if you need a specific action that doesn't fit neatly into an "edit" or "update" form? This is where you unlock the next level of RadSystems' power with Custom Endpoints.
First, What's an API Endpoint?
Before we dive into the "custom" part, let's quickly demystify the term "API Endpoint."
Think of an API (Application Programming Interface) as a waiter in a restaurant. Your application's frontend (what the user sees) is the customer. The backend server and database are the kitchen.
- The customer (frontend) decides they want a steak. They don't go into the kitchen themselves.
- They call the waiter (the API) and place an order (a request), saying "I'd like the steak, medium-rare."
- The waiter takes this specific instruction to the kitchen (the backend).
- The kitchen prepares the steak and gives it back to the waiter.
- The waiter brings the food back to the customer (a response).
An endpoint is simply the specific "address" the waiter goes to for a particular request. For example, /api/tasks might be the endpoint to get all tasks, while /api/tasks/5 might be the endpoint to get the single task with ID 5.
RadSystems automatically generates a complete and robust set of these API endpoints for all your standard CRUD operations. But its true genius lies in allowing you to create your own.
The Project & The Goal: A Smarter Task Manager
To demonstrate this, we've built a simple Personal Task Management application using RadSystems, generating a Laravel, Bootstrap, and jQuery project. The database has just two tables: projects and tasks.
The standard way to mark a task as "complete" would be:
- Click the "Edit" button for a task.
- Navigate to the Edit Task page.
- Change the status dropdown to "Complete".
- Click the "Save" button.
- Be redirected back to the task list.
This works, but it's clunky.
Our Goal: We want a modern, fluid user experience. We will display all incomplete tasks in a custom view. Next to each task, there will be a simple button. When the user clicks the button, the task is instantly marked as "complete" in the database without a page reload and without ever visiting the edit page. Just to add a bit of a flavour to it, we will add some animation to the button and we will make the task disappear from the list with a nice little fade effect once our Custom Endpoint marks the task as "completed".
The Logic: How We'll Achieve It
This seamless experience is made possible by a Custom Endpoint. Here’s the logical flow:
- User Action: The user clicks a button next to an incomplete task on our custom "Pending Tasks" list page.
- Frontend Call: A small piece of jQuery/JavaScript code intercepts this click. It immediately sends an asynchronous request (an AJAX call) to a special URL we define—our custom endpoint. It passes the unique id of the task along with the request.
- Custom Endpoint Execution: RadSystems routes this request not to a standard controller, but to our custom-built controller method.
- Backend Magic (Laravel Eloquent): The code within our endpoint receives the task id. It uses Laravel Eloquent to find the corresponding task in the database, update its status field to "complete", and save the change.
- Confirmation: The endpoint sends back a success response to the frontend, which can then be used to execute a little bit of animation and make the entire row of the task marked completed disappear from the table!
Understanding the RadSystems' Custom Endpoint UI
Click the Custom Endpoint button from the top toolbar of RadSystems Studio, and you’ll be greeted with the intuitive Custom Endpoint Editor. This powerful yet simple interface allows you to define your own logic and expose it as an API—perfect for cases where standard CRUD isn’t enough.
Let’s break down the editor window step-by-step:
Left Panel: Endpoint Manager & Snippets
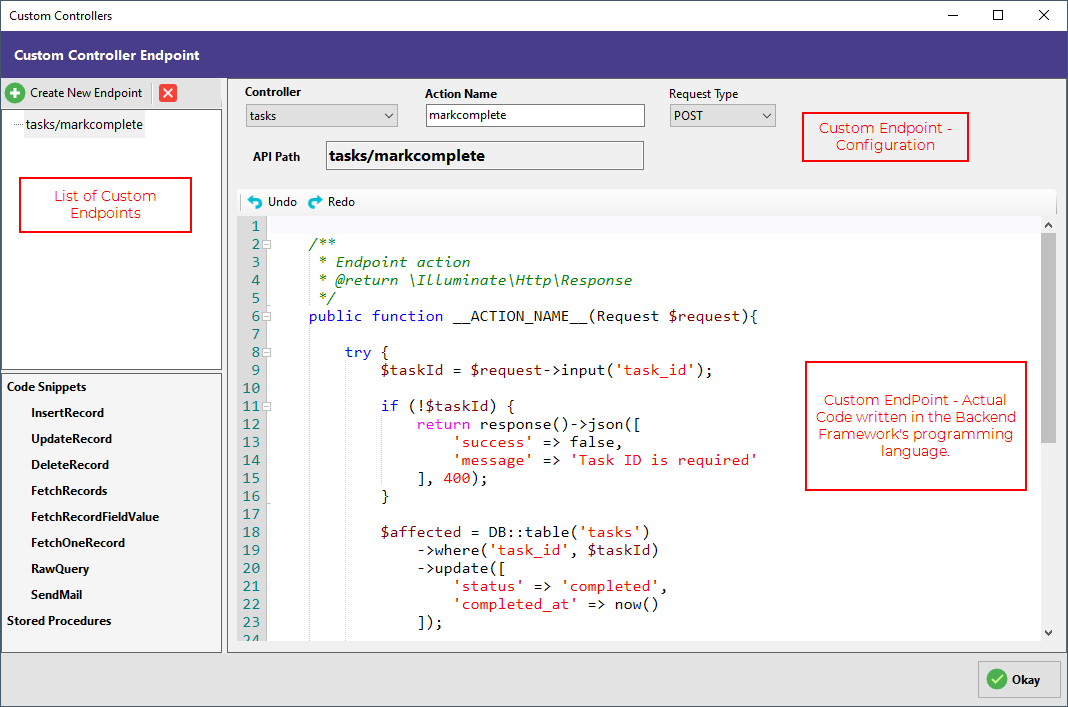
On the left side, you’ll find a list of all the custom endpoints you’ve created so far.
- Create New Endpoint: Click the green + button to create a new endpoint.
- Delete Endpoint: Use the red × button to delete the selected one.
- Endpoint List: Each endpoint is listed by its full API path (e.g.,
tasks/markcomplete). Clicking one loads it in the editor. - Code Snippets: Just below, you'll see a list of pre-written code snippets for common actions.
Middle Panel: Endpoint Configuration
The main panel at the top is where you define your endpoint’s behavior:
- Controller: Select which controller (e.g.,
tasks) this endpoint belongs to. This determines where the method will live. - Action Name: This will be the method name. In our example, we’ve named it
markcomplete. - Request Type: Choose between
GET,POST,PUT, orDELETE. For most logic updates (like marking something as complete), you’ll usePOST.
Just below, RadSystems shows you the API Path that will be exposed (e.g., /tasks/markcomplete). This is the endpoint you’ll call from your frontend or app using AJAX, Postman, or any HTTP client.
Code Editor: Write Your Custom Logic
The large code editor area below is where the main logic is written.
- It comes prefilled with helpful function comments.
- Your function is scaffolded with the name
__ACTION_NAME__, which RadSystems will replace with your actual action name when saving. - You write your logic using Laravel and the full power of PHP. In the example shown, we use
$request->input('task_id')to fetch the task ID, validate it, and then update the task using Eloquent.
This editor supports syntax highlighting, undo/redo, and snippets, so you can stay productive.
Save and Exit
Once your code is written, click the green Okay button at the bottom right to save the endpoint and close the editor. RadSystems will automatically wire up the route, controller method, and security layer behind the scenes.
Implementation Steps: Mark Task as Complete Without Opening Edit Page
To help you explore the Custom Endpoint feature hands-on, we've created a downloadable demo project complete with dummy data and all required setup files.
Step 1: Download the Project and Database
Start by downloading the demo project bundle which includes:
- Project file
- SQL file containing demo data for
projectsandtaskstables
Step 2: Prepare the Database
- Open your preferred MySQL client (e.g., phpMyAdmin or MySQL Workbench).
- Create a new database (e.g.,
taskmanager_demo). - Import the provided
.sqlfile into this new database. It contains two tables:projectsandtasks, along with some sample tasks.
Step 3: Open the Project in RadSystems Studio
- Launch RadSystems Studio.
- Click Open Project and select the downloaded project file (
.radsys). - When prompted, select the database you just prepared.
- Let RadSystems auto-detect the structure and relationships.
- Once done, save the project again to ensure changes are committed.
Step 4: Publish and Run the Project
- Go to the Publish tab.
- Click Publish Project to generate all necessary code.
- Open your browser and launch the project locally to verify everything is working.
Step 5: Implement the Custom Endpoint
Now let’s set up the backend logic to mark a task as complete.
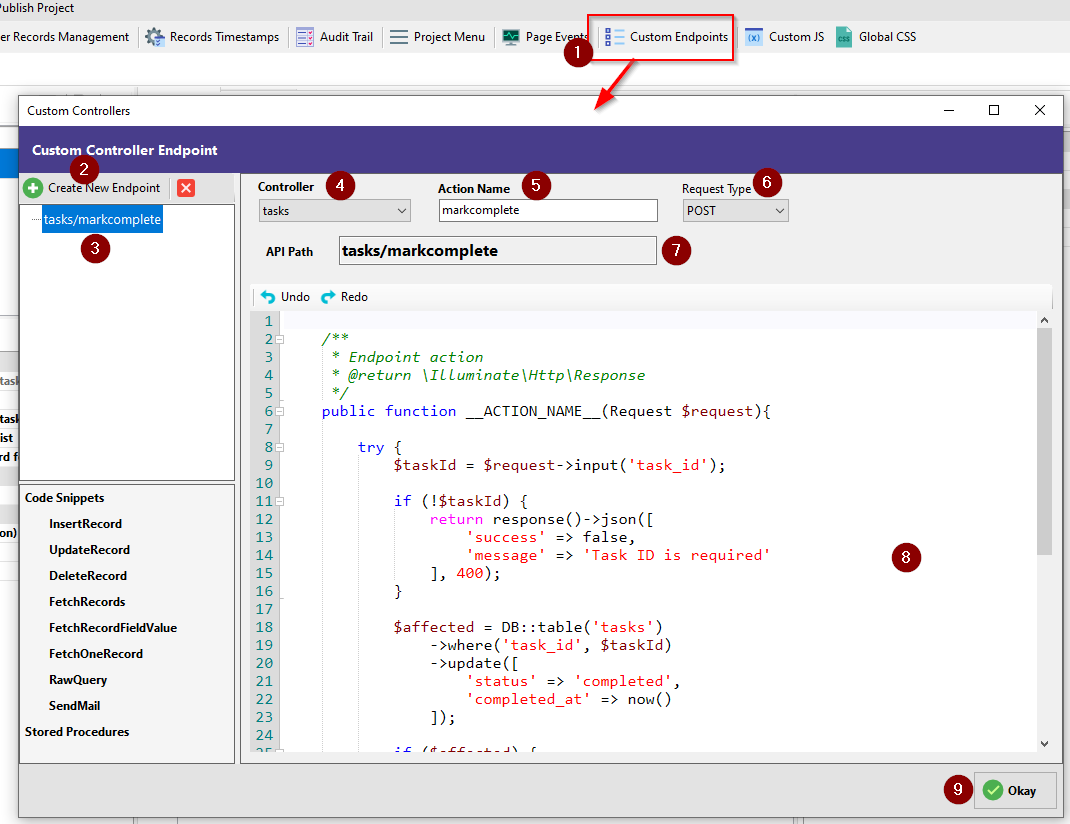
- In RadSystems Studio, click Custom Endpoint from the top toolbar.
- Create a new endpoint with the following values:
- Controller:
tasks(since we’re modifying a record in thetaskstable) - Action Name:
markcomplete(use an intuitive name) - Request Type:
POST
- Controller:
This creates an endpoint at:
/tasks/markcomplete
Now, in the code editor:
- Read the
task_idsent via AJAX using$request->input('task_id') - Use Laravel Eloquent to find and update the task’s
statusfield - Return a JSON response with a success or failure message
This ensures your AJAX call will know whether the update was successful or not.
Step 6: Modify the Custom View
Let’s move to the Pending Tasks view which shows only incomplete tasks.
- Go to Custom Views →
pendingtasks. - Add a Bootstrap 5 button in each row using RadSystems’ Custom List Field feature.
- Assign the button an
idthat dynamically includes the task’s ID.
<a href="javascript:void(0);"
   id="task-{{ $data['task_id'] }}"
   class="task-action btn btn-success"
   data-task-id="{{ $data['task_id'] }}">
   Mark Complete
</a>
Step 7: Write the JavaScript to Call the Endpoint
- Click the Design button next to the
pendingtaskslist page. - Then click Page Custom JS to open the JavaScript Code Editor.
- Inside, write JavaScript that:
- Listens for a button click
- Extracts the task ID from the button's ID
- Sends an AJAX POST request to
/tasks/markcompletewith the task ID - Waits for the response
In the success callback:
- Remove the row from the table, since the task is no longer pending
In the error callback:
- Show an alert or message saying something went wrong
That’s it! You’ve now connected your UI directly to a custom backend logic endpoint—without the user needing to open the edit page.
And, the End Result...
With just a few clicks and some intuitive logic, we used RadSystems Studio's Custom Endpoint feature to create a highly useful enhancement: allowing users to mark tasks as complete without opening the edit form. This is a small but powerful example of how RadSystems empowers developers to go beyond basic CRUD without getting buried in boilerplate code.
What makes this even better is that you didn’t have to manually write routes, controller methods, or response handlers from scratch. RadSystems took care of the scaffolding so you could focus purely on the logic—fast, efficient, and reliable.
This low-code flexibility is ideal for anyone building real-world apps that need small, meaningful customizations—whether you're working on internal tools, client dashboards, or production-grade systems.
Try It Yourself – Free for 7 Days
Want to see it in action on your own system?
- Download the demo project from the link above
- Test the custom endpoint feature yourself
- Or apply the same logic to your own apps right now
👉 https://radsystems.io/download
Give it a spin. You might just stop writing boilerplate code for good.