Building Secure Apps with RadSystems Studio: Authentication, Roles & Record Level Protection
Strong authentication forms the backbone of secure applications, guarding against unauthorized access, data breaches, and insider threats. RadSystems Studio takes this responsibility seriously by integrating a robust, industry-standard authentication layer right into its no-code environment.
In the landscape of modern business applications, strong authentication is no longer optional—it’s foundational. As organizations digitize their workflows and data, ensuring that only authorized users can access critical resources is vital. Strong authentication forms the backbone of secure applications, guarding against unauthorized access, data breaches, and insider threats.
RadSystems Studio takes this responsibility seriously by integrating a robust, industry-standard authentication layer right into its no-code/low-code environment. Whether you're building an internal enterprise dashboard or a public-facing web app, the platform ensures that your authentication setup follows best practices. One of the key strengths of RadSystems Studio is its security-first design—user passwords are never stored in plain text. Instead, they are hashed using modern cryptographic techniques before being saved to the database, dramatically reducing the risk of password leakage.
The platform provides a clean, three-step approach to implementing secure user access and management:
1. Authentication
This step is all about login and access control. You configure how users authenticate—using usernames, emails, or both—and define essential parameters like password policies, session duration, and login behaviours. It's a complete authentication system without writing a single line of backend code.
2. Roles and Permissions
RadSystems Studio allows you to create multiple user roles such as Admin, Manager, or Customer. Each role can be configured to access only specific pages, buttons, or actions. You can even control visibility at the component level, ensuring a tailored experience for every role.
3. User Records Management
Beyond role-based access, you can also define record-level visibility rules directly from the table schema. This lets you control which data a user can see or edit based on their role or assigned ownership, such as showing only a user's own orders or tasks. It’s incredibly powerful for real-world multi-role business applications or internal apps with strict access boundaries.
Now that we understand the broader architecture, let’s now walk through the Authentication screen in RadSystems Studio and understand how to quickly set up a secure, functional login system—without writing any code manually.
Step-by-Step Guide to Authentication Setup in RadSystems Studio
The Authentication Setup screen in RadSystems Studio provides a powerful visual interface to configure your authentication module. Here’s how the workflow typically unfolds:
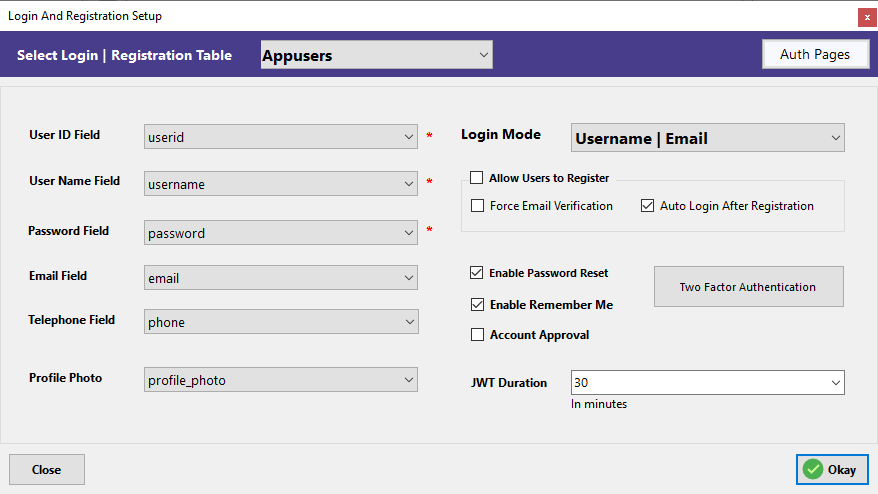
1. Select the Table for Login and Registration
Start by choosing the database table that holds your user credentials—usually something like Appusers. This is the table where RadSystems will map login, registration, and profile data.
2. Map the Fields
Next, map the essential fields required for authentication. These include:
- User ID Field – Typically the primary key (e.g.,
userid) - User Name Field – The login name field (e.g.,
username) - Password Field – The password field (e.g.,
password) - Email Field – Required for registration and password recovery
- Phone Field – Used optionally for 2FA via SMS
- Profile Photo – For user profile avatars
These fields are auto-populated based on your schema but can be customized easily.
3. Configure Authentication Behavior
RadSystems gives you granular control over how login and registration should behave:
- Login Mode – Choose between
Username,Email, or both. - Allow Users to Register – Enable self-registration for public-facing apps.
- Force Email Verification – Adds a verification layer before access is granted.
- Auto Login After Registration – Automatically logs in the user upon successful registration.
- Enable Password Reset – Lets users reset forgotten passwords.
- Enable Remember Me – For persistent login sessions.
- Account Approval – Adds admin control for activating accounts.
- JWT Duration – Set token expiration time in minutes for secure API-based apps.
4. Configure Two-Factor Authentication (2FA)
Click the "Two Factor Authentication" button to open a dedicated configuration screen (refer to the second screenshot):
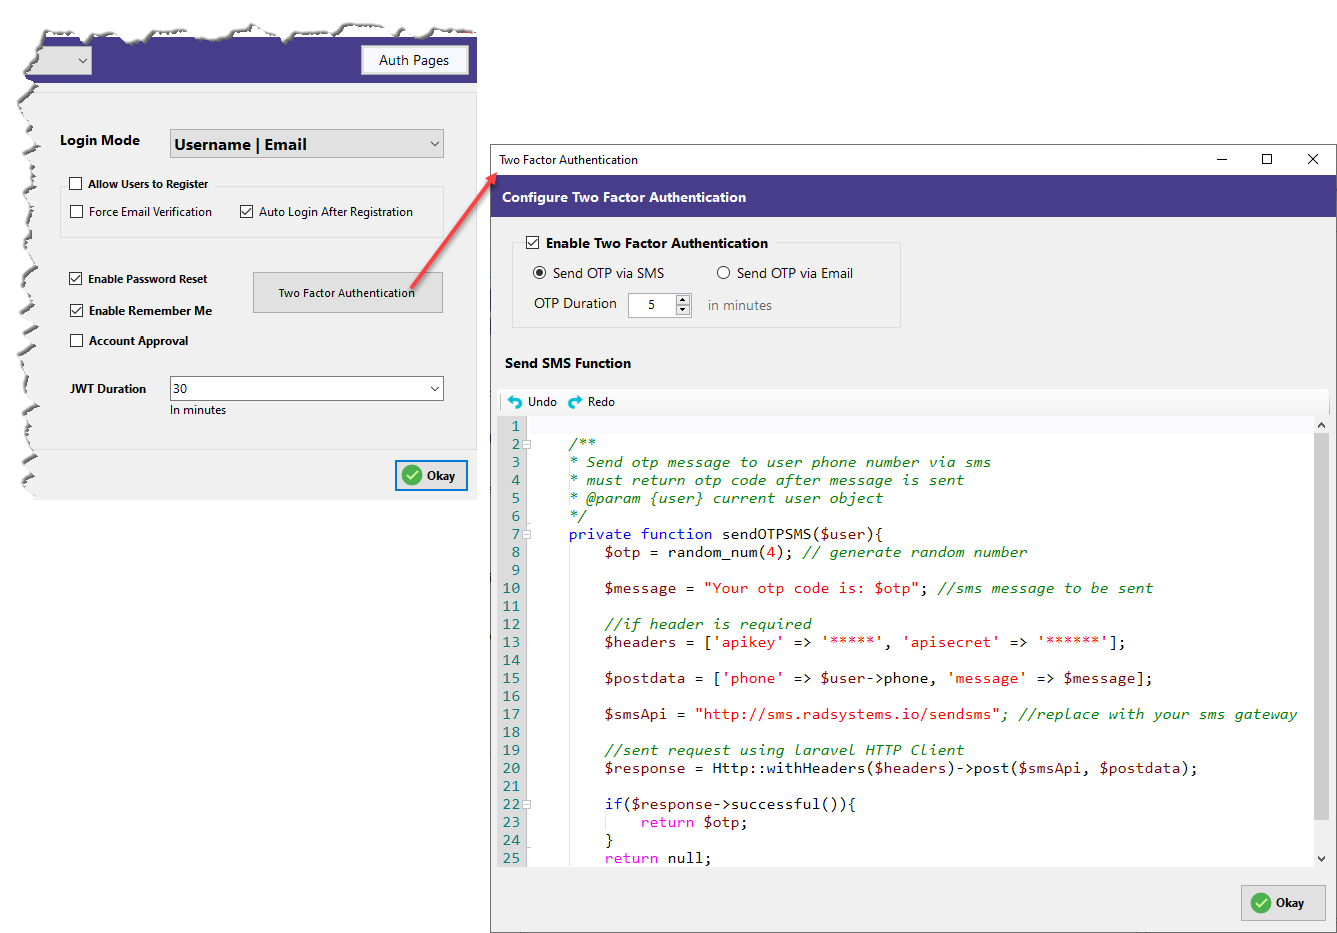
- Enable Two Factor Authentication – Activates OTP verification.
- Choose Delivery Method – Send OTP via SMS or Email.
- OTP Duration – Set how long the OTP is valid.
Customize the Send OTP Function – A pre-written server-side function is scaffolded for you, written in your chosen backend language.
For example, just plug in your SMS gateway URL and credentials to setup the delivery of OTP by SMS. Here’s what’s already handled:
- Random OTP generation
- Message formatting
- API integration via Laravel HTTP client (modifiable as needed)
- Return logic for successful delivery
Once set, just click OK to save the changes. RadSystems takes care of the wiring.
5. Save and Generate Tables Automatically
Finally, clicking Okay not only saves your configuration but also auto-generates the necessary backend logic and creates/updates the authentication-related tables in your database. No need to write migration scripts manually—it’s all handled.
Excluding Pages from Authentication
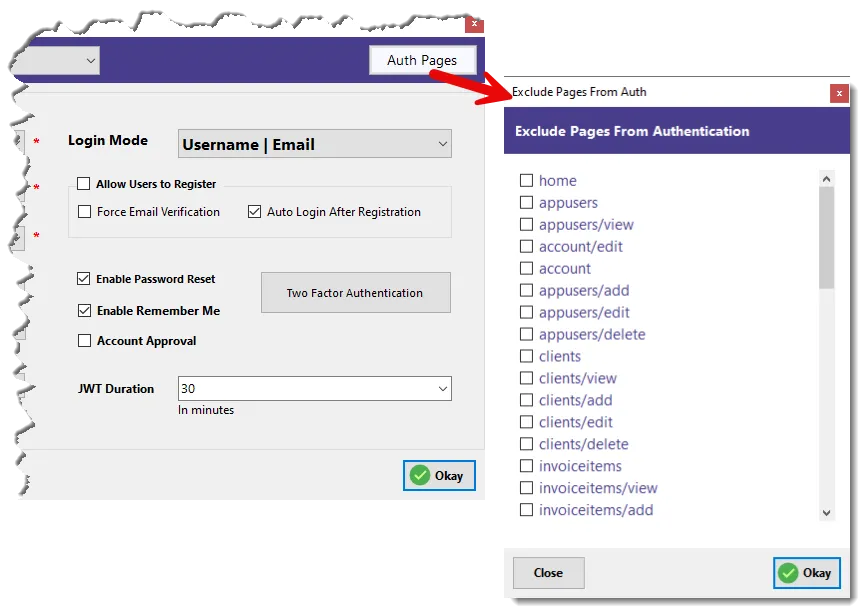
Sometimes, you may want specific pages to be publicly accessible—like a help page, public product list, or signup page. That’s where the Auth Pages button comes in.
Clicking it opens the Exclude Pages from Authentication dialog (see third screenshot). From here, you can check the pages that should not require login. For instance:
/clients/view/invoiceitems/add
With this intuitive setup, you can configure a secure, flexible authentication system with options that rival hand-coded solutions—yet all within a visual interface. Next up, we will explore roles, permissions, and how to implement fine-grained access control across application.
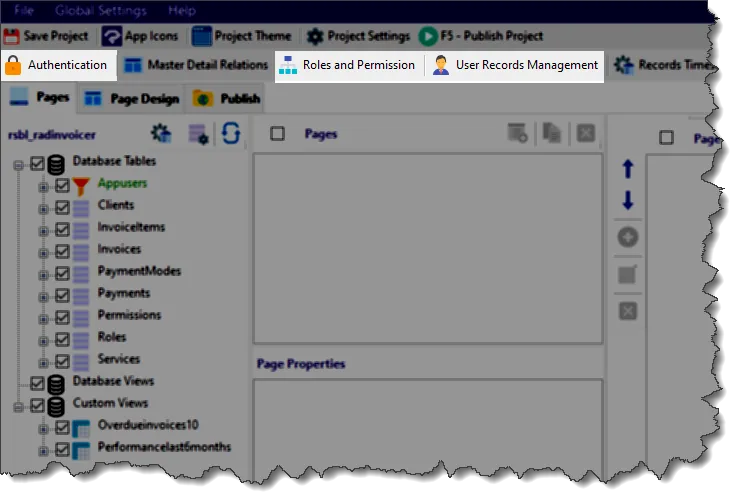
Roles and Permissions
Once you've configured the Authentication, head to the Functionality Button-bar and click on Roles and Permissions to manage multiple roles in your application.
RadSystems Studio allows you to define multiple user roles, and assign them granular permissions per table, per page. The best part? It's all dynamic—meaning the role and permission logic is stored in your database. This makes it easy to build admin interfaces inside your generated app, so new roles and access permissions can be added at any point without needing RadSystems Studio again.
Interface Overview
Refer to the interface shown in the screenshot:
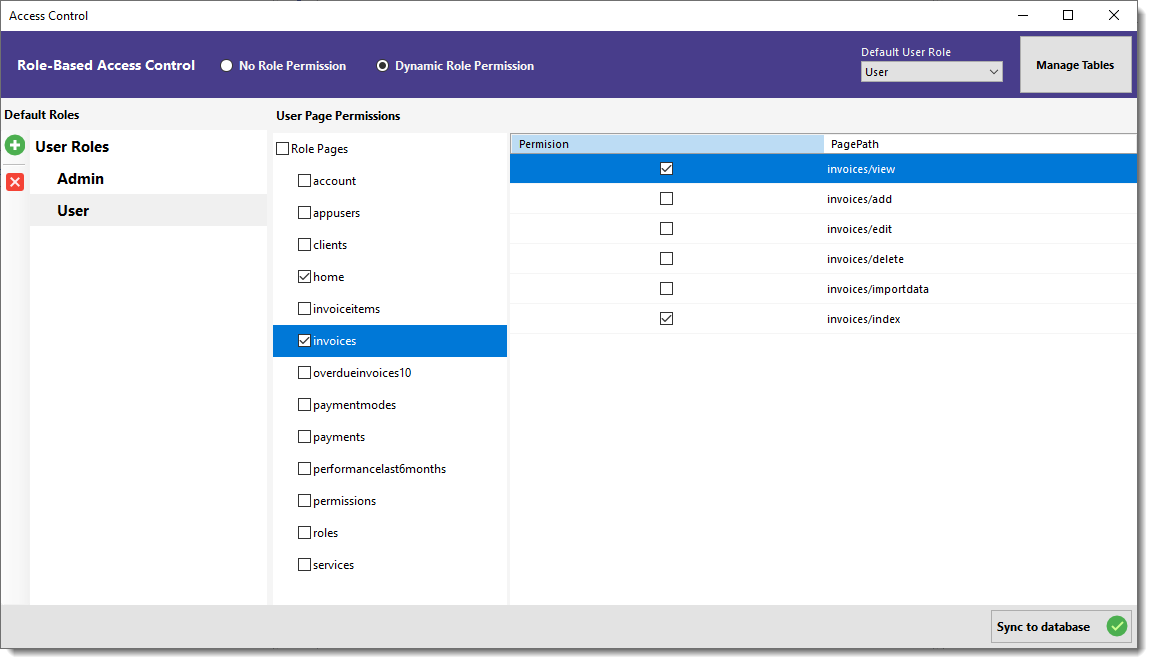
- Dynamic Role Permission
Start by selecting the Dynamic Role Permission radio button at the top. This enables full control of permissions from your database. - Default Roles
Two roles—Admin and User—are added by default. Select a role from this list to begin assigning permissions. Click the green button with the plus sign to add new roles, and the red button with the cross sign to delete any existing role. Make sure you have at least one Admin Role that has access to all tables and pages to avoid getting locked out of your own application. - Table Selection
After selecting a role, choose a table from the middle panel. You can tick the checkbox next to a table name to grant full access to all CRUD pages of that table. Alternatively, select the table and manually check/uncheck individual pages from the right-side list. - Page-Level Permissions
Fine-tune access by granting or denying permission to each page route, such asview,add,edit,delete, etc. This gives you granular control over what each role can access. - Default User Role
If you've enabled Allow Users to Register in the Authentication settings, the selected role here will automatically be assigned to all newly registered users. - Sync to Database
Click the Sync to database button once your role permissions are set. This saves all configurations directly to the database for use in your application.
Manage Tables
If you’re using RadSystems' default setup, required tables for roles and permissions are created automatically. But if you’ve already designed your own schema, use the Manage Tables button to map your existing tables and fields.
Refer to the second screenshot for this interface:
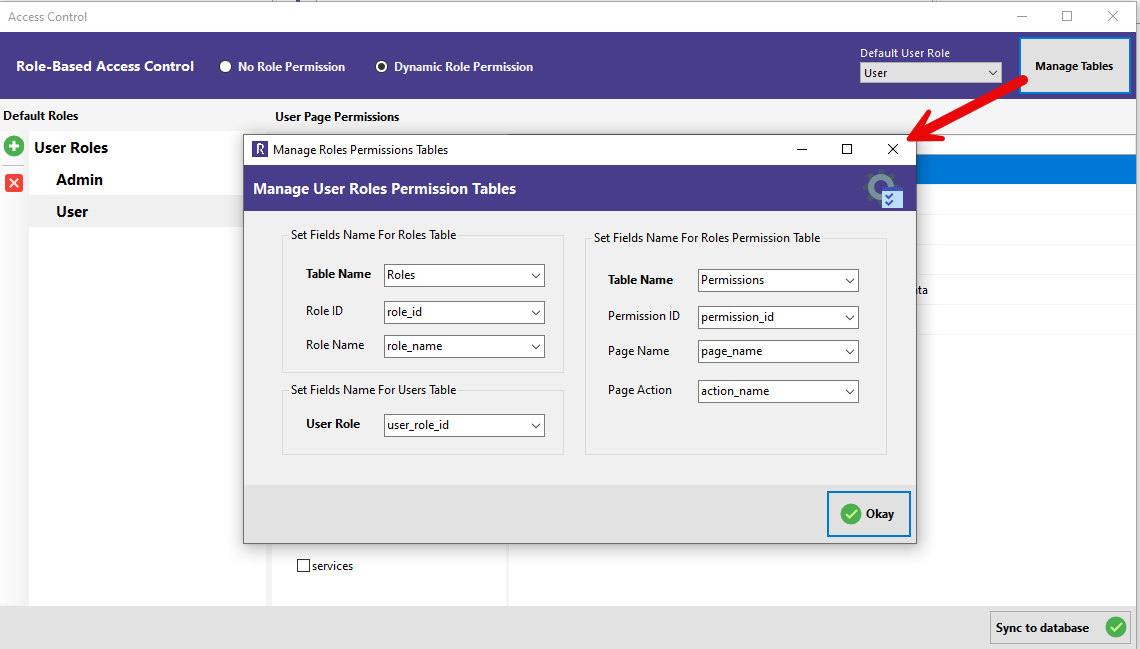
- Roles Table Mapping: Define the table and field names used to store roles. Common fields are
role_idandrole_name. - Users Table Mapping: Set which field in your users table represents the user role (e.g.,
user_role_id). - Permissions Table Mapping: Map the table and fields that handle permissions—usually with fields like
permission_id,page_name, andaction_name.
Click Okay once done. Your custom schema will now be used in place of RadSystems' defaults.
This approach gives you flexibility and future-proofing—perfect for applications that need evolving access control without rebuilding logic every time.
User Records Management
So far, we’ve set up Authentication to control access to the entire application and configured Role-based Permissions to control access at the table and page level. But RadSystems Studio goes even further—with User Records Management, you can restrict access per-record, ensuring that logged-in users see only the data relevant to them.
This is incredibly useful when handling sensitive or user-specific data—like in the RadInvoicer demo app, where clients must only see their own records and not those of others.
user_id of the logged-in user. RadSystems Studio uses this field to filter the data based on user login.Workflow:
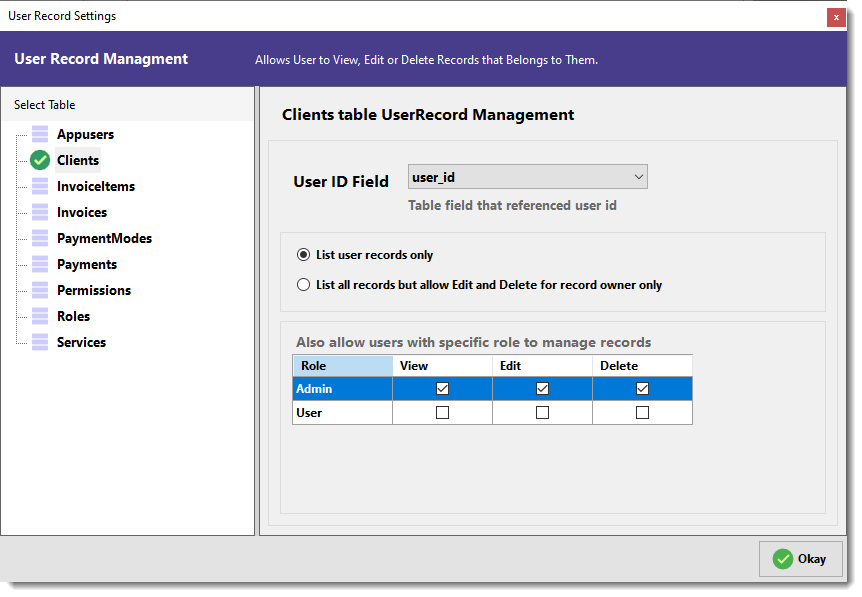
- Select Table
From the left panel, select the table for which you want to enable record-level access control (e.g.,Clients).
Tables with record-level control enabled will be marked with a green tick. - Select User ID Field
Choose the field (e.g.,user_id) that references the logged-in user. This is used to identify which records belong to which user. - Select Listing Rule
- List user records only – restricts the user to view only their own records.
- List all records but allow Edit and Delete for record owner only – shows all records but allows editing/deleting only their own records.
- Create Exceptions by Role
You can override the record-level restriction for specific roles. For example, give Admin full access by ticking all three boxes: View, Edit, and Delete. This ensures the Admin can manage all records regardless of ownership. - Save
Click the green Okay button to save your settings.
Repeat this process for every table where you want record-level access control. It's a simple yet powerful way to protect your users' data and enforce privacy by design.
Start building Secure, Smarter and Faster Apps Today!
With RadSystems Studio, you're not just building applications—you're crafting secure, scalable systems with fine-grained control over who can access what. From basic authentication to table-level and now record-level permissions, RadSystems gives you all the tools to confidently develop real-world, production-grade apps without writing endless lines of code. Whether you're working on a client-facing portal or an internal management system, this level of access control ensures that data stays safe, relevant, and personalized. The intuitive visual interface makes complex permission logic easy to implement and even easier to manage.
Comments ()